Table of contents
- What are pipelines
- DevOps pipelines
- What CI/CD pipeline software to use?
- Why did we choose GitLab?
- Docker Technology
- gitlab-ci.yml file
- Pipeline lifecycle example
- Conclusion
What are pipelines?
In computing, pipeline refers to the logical queue that is filled with all the instructions for the computer processor to process in parallel. It is the process of storing and queuing tasks and instructions executed simultaneously by the processor in an organized way.
This is different from the regular queue or stack data structures in computer science. These data structures work in FIFO or LIFO approaches, respectively. This means literally “First In First Out” or “Last In First Out” principles, no matter if working with elements, instructions, files, or any other arbitrarily listable item.
DevOps pipelines
DevOps is a set of practices that combines software development and IT operations. It aims to shorten the systems development life cycle and provide continuous delivery with high software quality. DevOps is complementary with Agile software development; several DevOps aspects came from the Agile methodology.
So if you’re planning on having an ‘agile’ work environment, you must have good software foundations and automation processes set in place to achieve fast-paced development and results. If everything is done manually, the environment would be rigid, stiff, and slow, thus being the opposite of agile.
What is CI/CD?
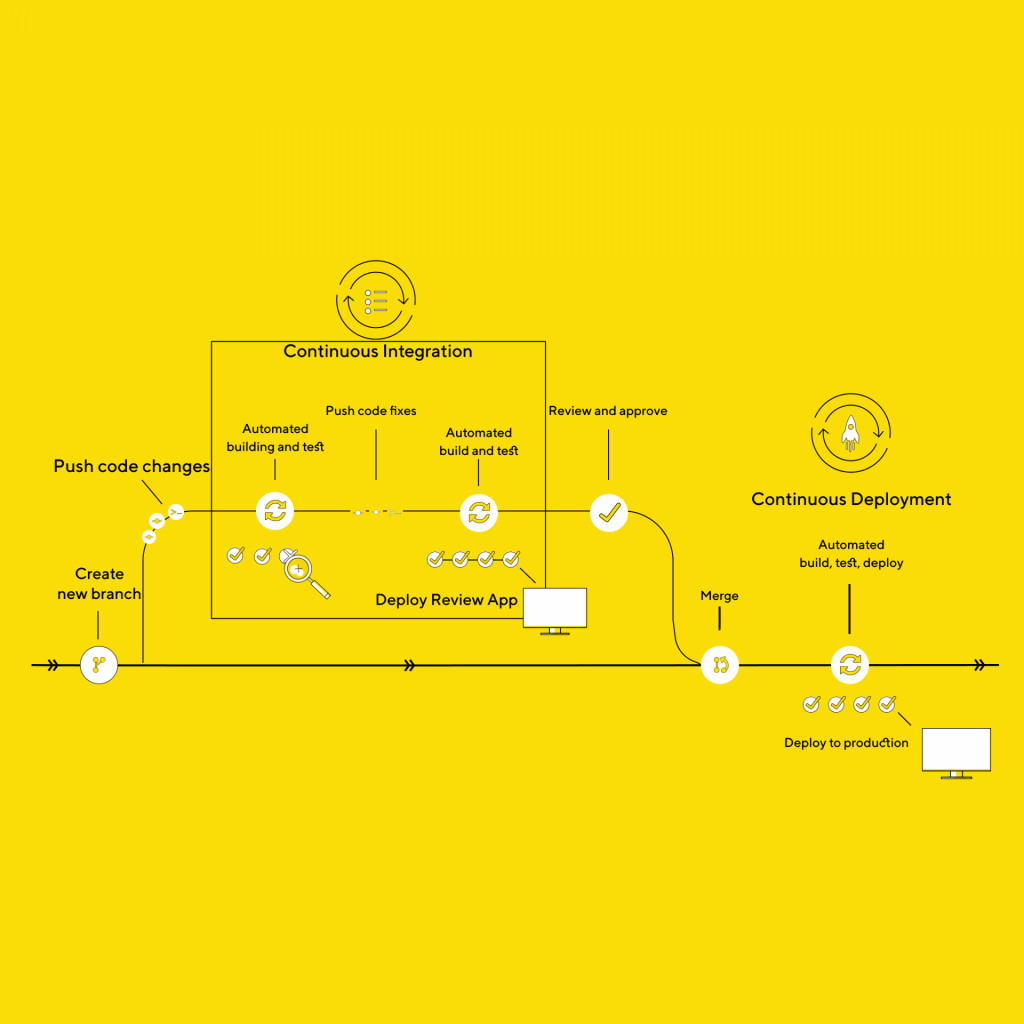
In software engineering, CI/CD or CICD is the combined practice of continuous integration, and either continuous delivery, or continuous deployment. CI/CD bridges the gaps between development and operation activities and teams by enforcing automation in the building, testing, and deployment of applications. This would preferably shorten the gap between developers developing the project locally in their IDE and the project being published in their typical production environment, either on public domain for clients or private domain for staging with other branches of the product development lifecycle (backend/frontend/design/QA/testers/…).
It works on my machine ¯\(ツ)/¯
Not only that we’ve shortened the gap between the developer and productional environment, but we’ve also introduced an assurance that it will work within the productional environment. The main component of CI/CD is that we run install/compilation, build, and test inside the environment that mimics production. Therefore, we’ve eliminated the chance of “but it works on my machine” happening.

What CI/CD pipeline software to use?
There are many options available to provide continuous delivery and integration in your software development lifecycle. Some of the most popular CI/CD tools are:
Tool choice is a personal preference and depends on which of these tools fit your project, budget, requirements, language, technology, etc.
From this point on, we will focus on GitLab’s pipeline.
Why did we choose GitLab?
Well, the choice was not a hard one. GitLab is our default VCS and provides a rich set of features for CI/CD pipelines leveraging the Docker technology. The beauty of in-house CI/CD integration with your VCS is that the pipeline itself can be triggered by various developers’ events. The pipeline itself can be configured to trigger certain code blocks in all situations. For example, it can be triggered upon pushing to a particular branch, or by providing some specific trigger key within commit message, it can be triggered upon Merge Requests, upon the success of those merges, etc.

This approach allows the DevOps engineer to configure the pipeline so that other software engineers mindlessly continue with their usual workflows and are entirely oblivious to what’s happening in the background. This is great because now you need only one engineer to configure and maintain it, whereas the rest of the team/organization does not have to bother with learning the technology inside out to use it.
Alongside being our default VCS and having great flexibility, it can also be hosted on-premise. This way, we are not using GitLab’s servers (also called runners) but our own. GitLab’s pipeline will only charge you for computing time on their servers, so we are saving some money. But GitLab does have fast servers which are relatively cheap (10$ for 1000min of computation). That would be a good approach for big companies; it would cost much less in the long run than configuring their cluster of runners.
Docker Technology
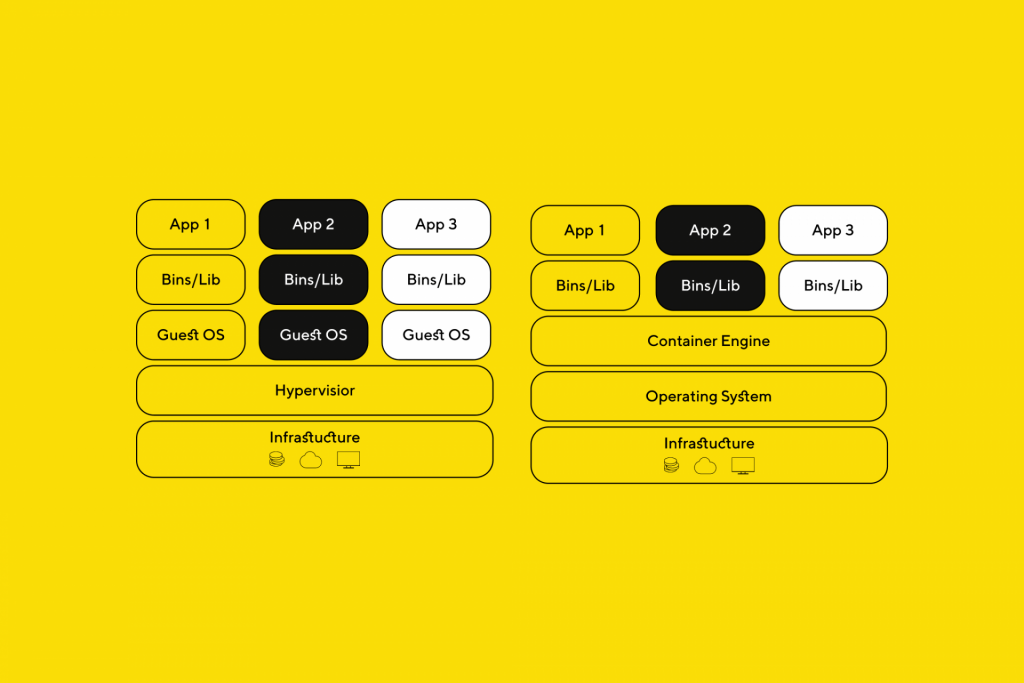
Docker is a set of ‘platform as a service’ products that use OS-level virtualization to deliver software in packages called containers. Containers are isolated and bundle their software, libraries, and configuration files; they can communicate with each other through well-defined channels. A Docker container image is a lightweight, standalone, executable package of software that includes everything needed to run an application: code, runtime, system tools, system libraries, and settings.

The main difference between Docker and Virtual machines is that Docker runs within its container virtualization engine, whereas virtual machines virtualize whole guest operating systems.
In raw, the Docker allows you to simulate the production environment by replicating it beforehand and then containerizing it and publishing it to hub.docker.com. The important thing to consider is that you want to keep your Docker image as minimalistic as possible because it does produce a heavy load for the machine using it. You want to containerize only the service you need to use and test, eg. for our backend stack, we’ve had to containerize PHP 8 on Ubuntu, and we’ve added node, npm, and composer to the container. That’s it, voila! Now you’d think that it’s wise to ship other technologies to the same container; for example, using this container to test the frontend services would be pretty inefficient.
A much better approach is to use a different image for each stack you require because otherwise, you will have unused software within your container.
“Yeah, I have it on my computer and server too, so what’s the deal?”
For every job in the pipeline, once started, the Docker fires a fresh container and boots it up. If you want it to be fast, you want it to be as minimal as possible. The backend will have only backend software on its image, whereas the frontend will boot up node.js image, without PHP and composer. Separating services in different containers will help you speed up the pipeline overall.
The boot time is the biggest overhead you get with additional software, but only if you are using the self-hosted runner. Otherwise, if you’re running the pipeline on GitLab servers, you need to download the image (container) at every step of the pipeline. And if you have big images with unneeded software, you will both download and boot longer, and GitLab charges per minute of processing time, meaning that you’re twice as inefficient.
GitLab-ci.yml file
YAML is used because it is easier for humans to read and write than other standard data formats like XML or JSON. Further, there are libraries available in most programming languages for working with YAML.
This file is the main configuration for your Gitlab pipeline. Whenever you add this file to your project, Gitlab will go through it whenever you change something within your project. Here you will define the flow of your pipeline, jobs, stages, what it will do, when will it execute, etc. By default, it will use shared GitLab runners where you’ll have 400 free minutes monthly.
The YAML file has a variety of keywords and control structures so you’re able to define the what and when. The content of the job, within the script tag, are the commands which will execute inside the Docker container containing your application. Here are some of the most common control structures:
image– defines which Docker container will run for a given job/pipeline (pulls from hub.docker.com)stages– define stages in which you can group your jobs. Stages run serially (one after another), whereas jobs within the same stage run in parallelonly– defines when a job will run (e.g. only on merge request)artifacts– defines which files will be shared between different jobs (because the new container is initialized per job, thus contents are lost unless specified with artifacts)cache– defines which files will be saved to the server for retrospectionscript– defines what commands will be executed within the container (OS-level commands, e.g.echo,apt-get install,composer install xy)
These are some of the main control structures out of many, for more you can check the documentation.
Pipeline lifecycle example
The pipeline starts from the .gitlab-ci.yml file. Here we’ll analyze a simple pipeline configuration and what happens each step of the way. We will consider the following pipeline for a front-end project.
image: node:latest

stages:
  - build
  - run

# Job's name
first-job:
  # Define stage
  stage: build
  # What to run on the job.
  script:
    - npm install
  artifacts:
    paths:
      - node_modules

second-job:
  stage: run
  script:
    - npm run start
    - node test.js
  artifacts:
    paths:
      - node_modules/

second-job-parallel:
  stage: run
  script:
    - echo "I'm running at the same time as second-job!!!"
As we can see, we have two stages, the first stage installs the modules and has only one job. The second stage kicks in if the first one finishes successfully and starts two jobs in parallel.

The first thing that happens once you push your code is that GitLab scans the .gitlab-ci.yml. If there are no limitations in configuration, the pipeline will be running on every push, merge request and merge result. Gitlab will then contact the ‘runner’, aka. the server which will be executing your pipeline. Note, if you have a single GitLab runner, they will queue in FIFO principle.
Once the server responds, it will start the Docker executor with the image you’ve specified. In our case, it is node:latest. If required, you can specify a different image for each job. If the server has the image cached, it will start using it. Otherwise, it will have to download it first.
Then, once you have your container ready and booted up, your project will be downloaded from your repository, and once you’re placed into the project root directory, it will start executing commands you’ve provided within the scripts list. In our case, it will install node modules. Once the job is finished, the artifacts will be uploaded so the following job using can download them back into the container. Then the cleanup kicks in, and the container is closed.
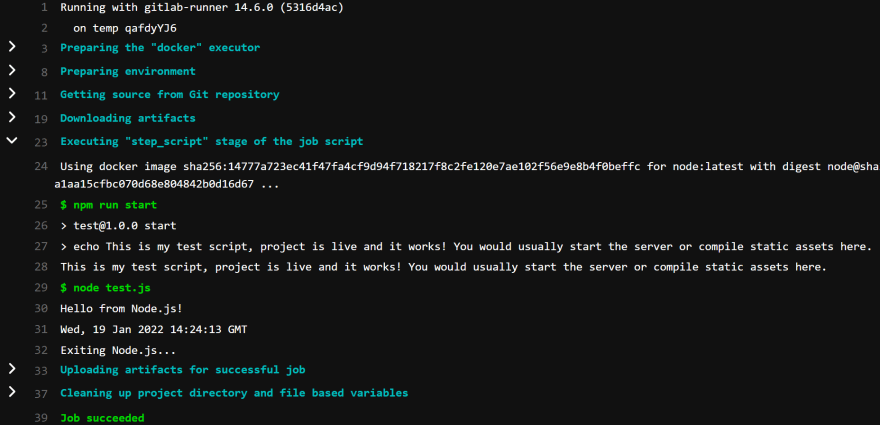
The second job is different, but only slightly. It will download the artifacts right after the project is downloaded, so we have everything ready for scripts. Once this job finishes, it will again upload the modified artifacts for whoever might be using them next. Other than that, it is the same as the first job regarding the structure. But the commands are slightly different, and here as an example, we run test.js to test if our application is working. Here are the contents of test.js:
console.log('Hello from Node.js!')
console.log(new Date().toUTCString())
console.log('Exiting Node.js...')
Here is the output from the second job:

And the last job is no different from the others, it just proved to us that two jobs can indeed run in parallel.
Conclusion
To conclude the pipelines, I would say that it is a must for any serious company to have these operations set in stone. Human error is removed from the equation and monotonous tasks are automatized. A good pipeline will also deploy the code to a staging server, the company’s internal server for testing, quality assurance, and collaboration; but ultimately, all productional deploys should be done manually by setting when key to manual in .gitlab-ci.yml file. Many more things could be done within the pipeline, such as benchmarking the app, stress-testing, and others. I might cover them in the next blog, but until then, what features do you think would make an awesome pipeline?
We’re available for partnerships and open for new projects. If you want to know more about us, click here.