Tech & Trends
28. 09. 2020
Establishing and securing a remote connection to Raspberry Pi
Today I’m writing about server security, specifically, on my homemade server running on Raspberry Pi. I’ve recently configured a homemade server (if you’re interested you should definitely check out this blog) with a still unknown purpose. This could be your standard Media server, IoT device controller, web server, or whatever else you can imagine. The possibilities are endless. This type of device is usually configured, plugged into power, and chucked behind your router/tv/any other bunch of wires. For convenience, you’ll probably enable SSH on it so it can be accessed from anywhere in the world without the need to connect a keyboard, mouse, and a screen to it.
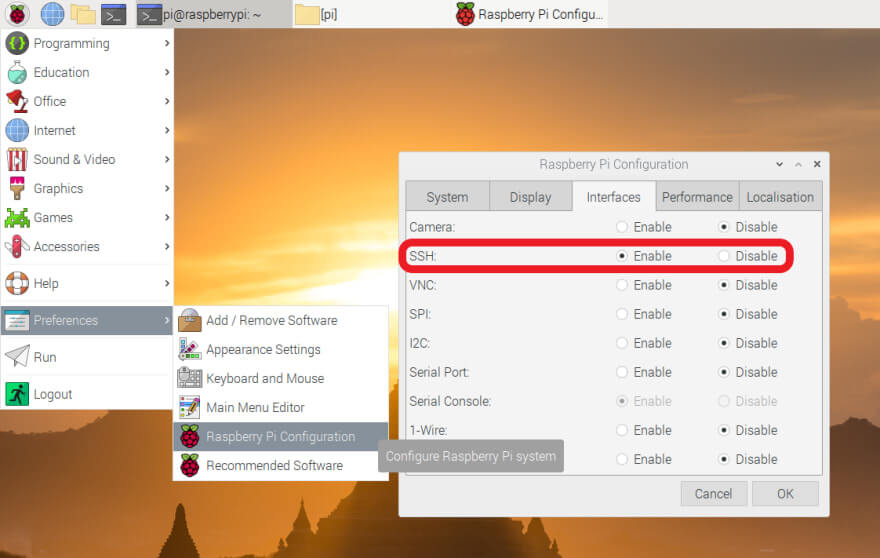
Enabling SSH on your Raspberry Pi
Enabling remote access to your pi is as easy as saying pie! This can be done through GUI or CLI, both are extremely simple. CLI is as simple as typing sudo systemctl start ssh. Then check if it’s working with sudo systemctl status ssh.
We’re halfway there to making your device public accessible. Once you’ve enabled SSH on your device you have to port forward connections from your router on port 22 (22 is the default SSH port) to your device. Port forwarding is simply telling someone who is connecting to the router, where to ask next (in this case, next is our Server). You can imagine the router’s address being a literal address of a building. You know who you want to visit, but don’t know exactly where in the building they are located. Once you reach the address (the router), it will tell you which floor and which apartment is the person you want to visit. This is what we do with port forwarding.
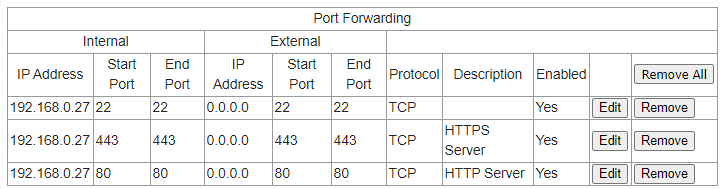
Port Forwarding
The next thing we have to do is configure port forwarding on our router. To access your router, you need to open up any web browser and in the URL bar, you should write your default gateway. The most common default gateway is 192.168.0.1 for many wireless home routers. If this isn’t working for you, you should check with google which is your default gateway. You will be presented by the login screen here; this is your router’s settings webpage. Don’t worry if this address resulted in “This site can’t be reached” response. You will have to google up your router anyways to find credentials to log in to your router. Once you’re logged in, you should look for something that says “Forwarding” and add a new rule there.
Now to know where we want to forward incoming requests to, we should know our local raspberry pi address. With the command hostname –I we can find out which local address we’re on.
tomas@raspberrypi:~ $ hostname -I
192.168.0.27
Now we can tell our router the following: “Whenever someone tries to connect to you, using SSH (common port 22), you should redirect them to this other device at address 192.168.0.27, also to port 22.”. This might not look the same to you, but should be very similar. Here are my forwarded ports. Internal refers to devices within the household and external is wide public. External is kept 0.0.0.0 since it’s not fixed (dynamic IP mentioned before), and router will translate this into it’s external IP.
Once you have configured port forwarding, you still shouldn’t be able to connect to your machine. This is due to your firewall doing a great job of blocking incoming requests. If you’re able to connect to your machine right after this step, please install a firewall immediately with sudo apt-get install ufw.
The final step is enabling your firewall with the following command:
tomas@raspberrypi:~ $ sudo ufw allow OpenSSH
Rule added
Rule added (v6)
tomas@raspberrypi:~ $ sudo ufw allow SSH
Rule added
Rule added (v6)
tomas@raspberrypi:~ $ sudo ufw status
Status: active
To                         Action      From
--                         ------      ----
OpenSSH                    ALLOW       Anywhere
WWW Full                   ALLOW       Anywhere
443                        ALLOW       Anywhere
SSH                        ALLOW       Anywhere
OpenSSH (v6)               ALLOW       Anywhere (v6)
WWW Full (v6)              ALLOW       Anywhere (v6)
443 (v6)                   ALLOW       Anywhere (v6)
SSH (v6)                   ALLOW       Anywhere (v6)

tomas@raspberrypi:~ $
This should’ve opened your port 22, and now if you know your external IP address you should be able to connect to your raspberry pi from anywhere in the world. This can be done as simply as googling “whats my ip”.

Now we can connect to our machine from anywhere in the world. Windows, Mac OS X, Linux, and pretty much anything with CLI. It’s as simple as writing “ssh pi@188.252.184.34”. Which is trying to establish an SSH connection to a device located at 188.252.184.34 as the user pi”. The request will come to our router, the router forwards the request to our server and the server challenges us for the password.
C:\Users\Tomas>ssh tomas@martincic.dev
Password:
Linux raspberrypi 5.4.51-v7+ #1333 SMP Mon Aug 10 16:45:19 BST 2020 armv7l

The programs included with the Debian GNU/Linux system are free software;
the exact distribution terms for each program are described in the
individual files in /usr/share/doc/*/copyright.

Debian GNU/Linux comes with ABSOLUTELY NO WARRANTY, to the extent
permitted by applicable law.
Last login: Sun Sep 20 17:05:18 2020 from ::1
tomas@raspberrypi:~ $ exit
logout
Connection to martincic.dev closed.

C:\Users\Tomas>ssh tomas@188.252.184.34
Password:
And as hackers would say in movies: “We’re in!”. Now whatever you write within this command line will be executed on your server, where you are connecting to.
Tip: if you’re having trouble connecting, check CanYouSeeMe.org and look if port 22 is open. If it’s not open, you might have to contact your service provider to unlock port forwarding for you or you have configured something wrong.
Tip: most often, internet service providers will provide your router with so-called Dynamic IP, which means your IP address will change every 24/48 hours.
Notice I’m logging in with tomas@martincic.dev. This is user “tomas” trying to SSH into domain “martincic.dev” which will be resolved to my router’s external IP address (188.252.184.34). You see in the bottom part, I exit the connection and SSH again with my actual IP, it has the same effect.
Dangers of SSH
The first time I’ve configured my server it took about 8 hours for me to notice some rather suspicious activity. I was looking through my auth.log (log of all authentications) when I noticed some strange requests from even stranger places. This file is located at /var/log/auth.log. To see only failed authentications, you can use
cat /var/log/auth.log | grep ‘Failed password
Sep 13 12:20:57 raspberrypi sshd[11951]: Invalid user felipe from 171.227.23.152 port 45198
Sep 13 12:20:58 raspberrypi sshd[11947]: Invalid user carmen from 171.227.23.152 port 35314
Sep 13 12:20:58 raspberrypi sshd[11959]: Invalid user pos from 171.227.23.152 port 46060
Sep 13 12:21:04 raspberrypi sshd[11981]: Invalid user shell from 171.227.23.152 port 42546
Sep 13 12:21:10 raspberrypi sshd[11992]: Invalid user linux from 171.227.23.152 port 1201
Sep 13 12:21:14 raspberrypi sshd[12004]: Invalid user admian from 171.227.23.152 port 36314
Sep 13 12:21:19 raspberrypi sshd[12007]: Invalid user iris from 171.227.23.152 port 39514
Sep 13 12:21:30 raspberrypi sshd[12022]: Invalid user edwin from 171.227.23.152 port 34324
Sep 13 12:21:33 raspberrypi sshd[12025]: Invalid user pos from 171.227.23.152 port 40330
Sep 13 12:31:07 raspberrypi sshd[12054]: Invalid user admin from 141.98.9.163 port 43245
Sep 13 12:31:12 raspberrypi sshd[12061]: Invalid user admin from 141.98.9.164 port 40057
Sep 13 12:31:14 raspberrypi sshd[12068]: Invalid user user from 141.98.9.165 port 36501
Sep 13 12:31:18 raspberrypi sshd[12075]: Invalid user admin from 141.98.9.166 port 46491
Sep 13 12:31:24 raspberrypi sshd[12080]: Invalid user osmc from 75.157.255.178 port 39744
Sep 13 12:31:30 raspberrypi sshd[12094]: Invalid user operator from 141.98.9.162 port 40986
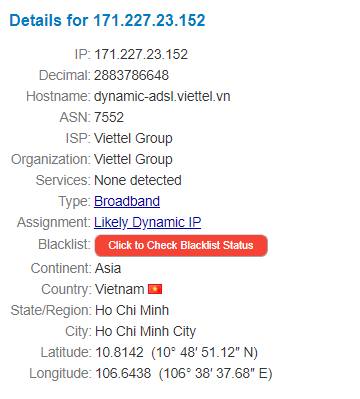
Sep 13 12:31:35 raspberrypi sshd[12102]: Invalid user test from 141.98.9.163 port 40121And after this command, I was greeted by some kind of brute force attack attempt. This was going on for 30 minutes, sending requests every 2-5 seconds with a different username but mostly from the same address. There were a total of 1083 login attempts within 30 minutes. A website called whatismyipaddress.com can give you interesting information about the IP address you’re looking up. The IP 171.227.23.152, which submitted alone more than 1000 login attempts, came from Vietnam.
This is the reason we have to improve our web security. This would be the equivalent of locking your door but leaving the keys under the doormat. Since the server is active 24/7 and you’re not on it every day it would be very easy for someone to let this bot work on your server until it cracks it. Once your server is accessed, it can too be used for malicious activities on the internet and help the initial bot in new attacks.
Installing 2-factor authentication
Setting up 2-factor authentication is relatively easy, and as with any other package you’re installing, you should first update your server with “sudo apt-get update”. You always have to make sure you’re running the latest version of your OS. We will install the Google 2 factor auth package called libpam-google-authenticator.
sudo apt-get install libpam-google-authenticator
Once you’ve downloaded the package for the server, you should install the application on your mobile device as well. Google authenticator is available on Play Store, Apple Store and even as Chrome Extension. Once you’ve installed this on both devices, you can move on to the next step.
Configuring Google Authenticator
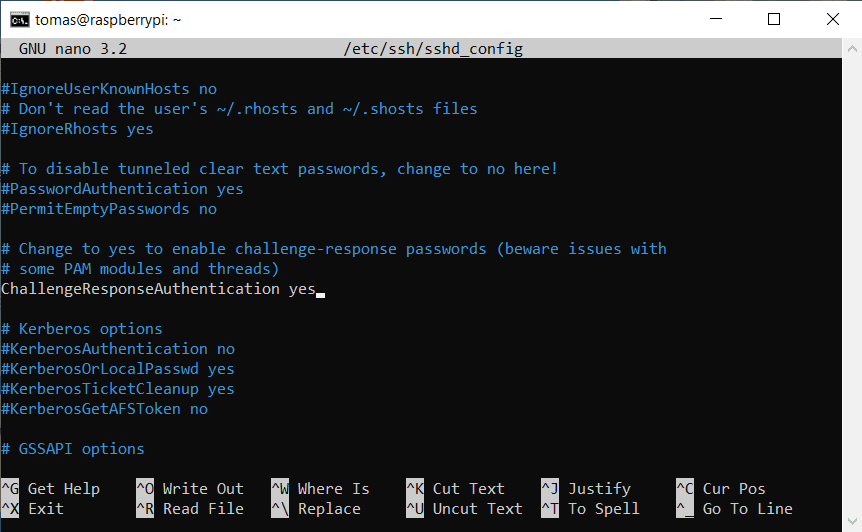
Before we even start configuring google authenticator we should enable ChallengeResponseAuthentication in our SSH daemon. This will enable your server to challenge users trying to connect with additional authentication. You can find out more about this here.
sudo nano /etc/ssh/sshd_config
Now once this is out of the way, we have to enable Pluggable Authentication Module (PAM for short). PAM provides dynamic authentication support for applications and services in a Linux system. We’ll find this file in /etc/pam.d/sshd.
sudo nano /etc/pam.d/sshd
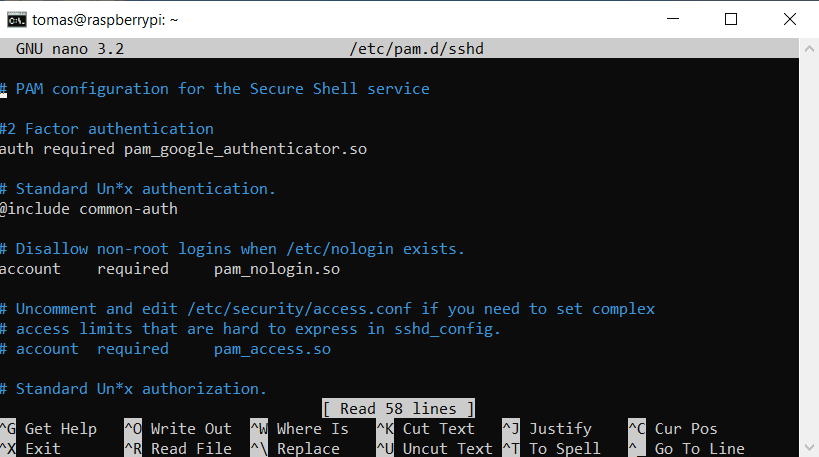
Here you have to add the following line:
auth required pam_google_authenticator.so
You can add the following line either above or below @include common-auth and the only difference is the moment you’re asked for authentication codes. Placing it above common-auth will result in the server challenging the user with authentication codes before the password, and placing it below will result in challenging after the password. I prefer before, so the bot trying to connect cannot even try to guess the password.
You should restart the SSH daemon now.
sudo systemctl restart ssh
You’re ready for the final step now! Activating Google Authentication. Now you should start the package we downloaded in the beginning and follow through its steps. It will provide you with a QR code that can be scanned from a mobile application and it will provide you with a setup key if you’re feeling uncomfortable providing the app with camera access. Start the process with:
google-authenticator
- Note: Once you’re presented by the QR code, take your time to write down emergency scratch codes, these are your lifeline if your mobile device isn’t accessible.
Now you could set this up however you like it. My choices were
- Time-based tokens [Yes]
- Update your /home/pi/.google_authenticator file (required Yes)
- Disallowing multiple uses of same token [Yes]
- Poor synchronization adjustment [No]
- Limit to 3 logins per 30 seconds [Yes]
And that’s it. You’re ready to try SSH with your new authenticator!
Conclusion
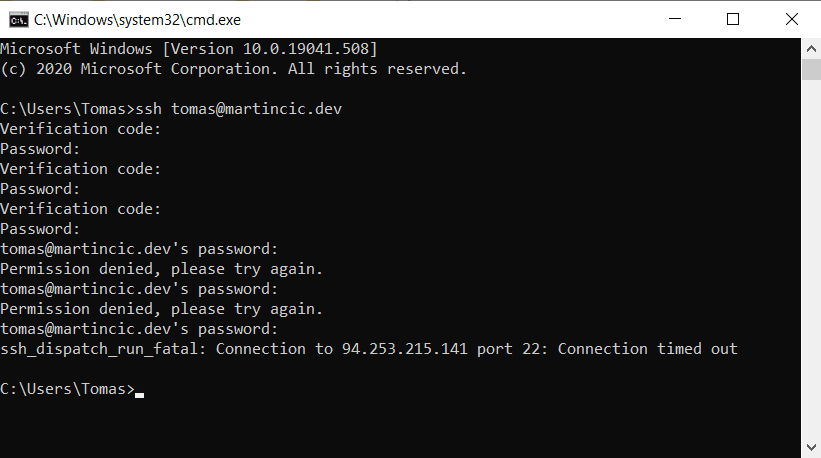
When the verification code is not matching, you will still be prompted for a password even though you failed step 1 of authentication. This is useful since any kind of attacker will have no idea that they failed step 1, and if a valid password is provided you still won’t be allowed access. You will be prompted for verification code 3 times before the authenticator completely blocks you out. In the picture below, when asked, I’ve provided the right password every time, but I’ve deliberately provided wrong verification codes. Google auth simply denies any sort of access if you provide the wrong code and simply waits for the connection to time out.
This SSH access to our remote machine can be useful for IoT devices and any kind of server maintenance. After adding additional authentication we’ve further improved security on our device. Even though the most secure method of accessing would be using a public/private key pair, this is not very convenient since you’re not carrying your key around you like your phone. This way you can show off to your friends and still have a good dose of security. While you’re not storing some very sensitive information on the machine, this method is secure enough.